Resources
 Part of the Oxford Instruments Group
Expand
Collapse
Part of the Oxford Instruments Group
Technical Article
Author: Dr Alan Mullan, Dr Isabel Goodhand
Published: 01 May 2022 · Last updated: 30 Jul 2025
In this article we look at what options you have to revitalize, or even extract more from your current microscope. Since the purchase of your microscope you might have changed your imaging needs with new research projects – and importantly, imaging technologies have also progressed. Thankfully, there are many upgrades that are simple add-ons, yet can make useful improvements to the data that can be acquired with your existing microscope.
Before you change any of the components of your microscope you should always make sure that it is performing as well as it should. Older filters within filter sliders, wheels or cubes deteriorate over time due to the use of high-intensity light sources (like metal halide lamps) over long time periods. You can inspect these filters quite easily and see if the coatings appear burned out, or have visible differences between the in and out of illumination areas. To ensure that all filter issues are found (as some may not be so visible), we recommend a full checkup by a trained service engineer. Note that the service technician will clean the delicate optical components correctly, and also replace, or advise replacement of any worn-out parts that are identified. These steps alone can revitalize an older microscope and bring it back to the full performance it once had. A clean filter will allow you to better detect signals that were reduced due to poorer performance. Importantly, new filters with higher efficiency coatings or more appropriate band passes will allow better signal levels from the sample, as well as potentially image new fluorochromes. It is also important to consider the software and PC used as part of the imaging system. If you can update to newer versions of your image acquisition software, you may be able to benefit from new features that have been introduced. If you are running older versions of your Operating System, you may be prompted to update due to security concerns. Sometimes this may create issues with older devices no longer being supported, and prompt changes to your imaging system. Examples of Software and hardware upgrade include:
In the rest of this article we discuss the benefits of specific microscope upgrades.
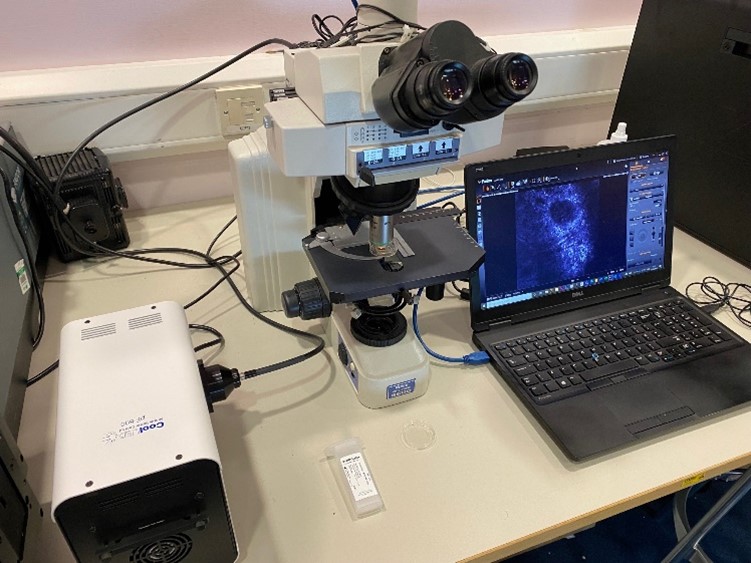
Figure 1: Even relatively basic microscopes can be upgraded with a new camera, illumincation, better software, photo-stimulation, super resolution, or multichannel imaging and much more.
If we consider you have your microscope in good working order, and updated the software, then we can consider how we can expand the abilities of your microscope even further.
Updating your camera to a new model is perhaps the single most effective way to improve the overall performance of any microscope. Many microscopes are sold initially as part of an overall package with a basic imaging camera that can easily be exchanged with a higher performance model.
A new camera can offer the following benefits:
Increase the spectral range – Some modern sensors have specific coatings that allow better capture of signals at both ends of the imaging spectrum in the UV and in the NIR (Near Infra Red). This would mean that the researchers will have improved sensitivity and even the ability to image using new fluorochromes that emit within this more biologically friendly region of the spectrum.
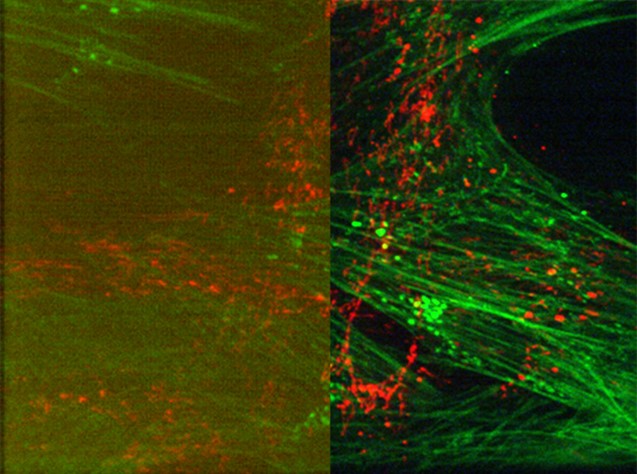
Figure 2: Modern sCMOS camera provide wider fields of view with much improved sensitivity and fast speeds. (Left) typical standard imaging camera, (right) same image taken with low noise Andor sCMOS camera. A camera upgrade can make significant improvements compared to cameras originally supplied with many microscopes.
With a range of cameras available it can be very helpful to discuss this with an applications specialist. They can help advise on what is important to your imaging needs as that may not be clear when confronted with many different technical specifications. However, as a general guide:
Find out more about microscopy cameras
Light source technology has come a long way over the last decade, particularly when it comes to widefield fluorescence microscopy. If you have older illumination such as a metal halide or mercury lamp for fluorescence (or halogen for transmitted illumination), upgrading to an LED Illumination System can have far-reaching advantages for data quality, ease of use – and even the environment:
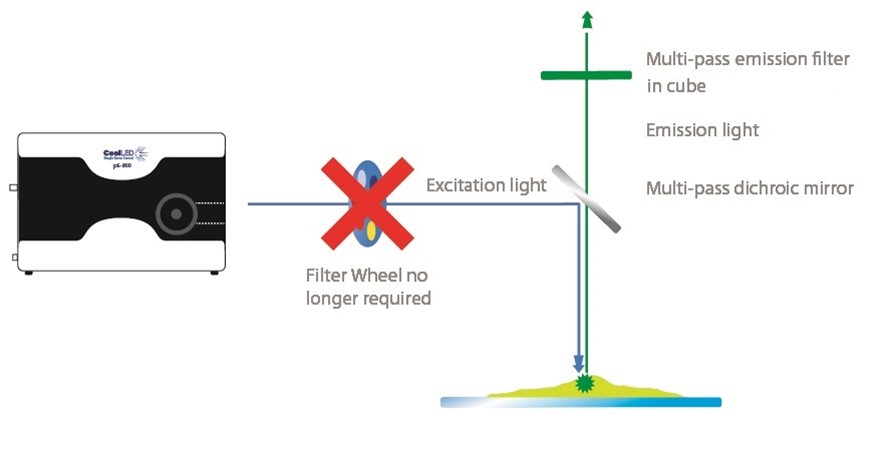
Figure 3: Capturing fast events with fluorescence microscopy using an LED illumination System and Pinkel filter setup. Controllable LED illumination systems such as the 8-channel CoolLED pE-800 Series, enable high-contrast multi-channel imaging. Individual LED channel switching and inline single-band excitation filters allow a Pinkel filter configuration (single-band excitation filters with multi-band dichroic mirror and emission filters) to replace the cost and latency of a filter wheel.
In Summary, besides improving data quality, upgrading to an LED Illumination System can result in a cost saving of £30,000,1 which is largely due to their longer lifetime and energy efficiency. Combining this energy efficiency with the absence of toxic mercury, LED Illumination Systems are also a popular upgrade for labs looking to become more environmentally sustainable.
There is no doubt that LED illumination systems are one of the best upgrades for transmitted or fluorescence illumination, but there are two important factors you need to consider: optical filters and compatibility. Many optical filters for fluorescence microscopy are optimized for mercury and metal halide, and LED-optimized filter sets may be necessary for maximizing the signal-to-noise ratio. Filter recommendations are available on manufacturer websites (e.g., CoolLED, Chroma). Before making a purchase decision, it is important to ensure your microscope is compatible with the LED illumination system of choice, and we recommend checking manufacturer websites such as the CoolLED adaptor search tool.
Find out more about LED Illumination Systems
While LED illumination is the cost-effective option for widefield fluorescence, imaging systems such as confocal systems may have laser-based illumination. Laser based illumination allows higher power densities than other illumination sources, making them particularly suitable for photobleaching, ablation and super-resolution imaging experiments. Of course, lasers are not all about their high-power potential, and can be used at the lower illumination intensities of live cell imaging.
Laser based light sources should be checked by a trained service technician. Over time, the power output of laser lines in the system can drop, and/or ends of fiber optic cables can degrade, reducing the amount of excitation light on the sample. These may be replaced to regain performance, or you may consider new lasers line that offer different wavelengths and improved power outputs e.g. towards the NIR region. Andor provide integrated laser engines that provide up to 8 laser lines across a wide VIS-NIR range.
Simultaneous multichannel imaging with a single camera
Simultaneous multichannel imaging has become more commonplace – from observing more labelled components of the cell to finding interactions of several specific proteins in a process, or simply to speed up imaging.
With modern high-resolution cameras with large sensor sizes, it is possible to use image splitters to split image channels across the sensor, and it can be an alternative to a multi-camera imaging set-up. This method is also much less costly than adding additional cameras for each extra channel. There are options available in which you can split the image in 2, 3 or even 4 channels.
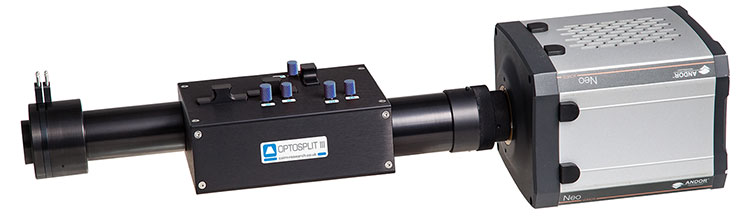
Figure 4: The Optosplit splits up to 3 imaging channels across the camera sensor. This provides a cost effective route to multi-channel imaging.
In such applications, you need to select the suitable filter cubes or use a filter wheel to split out the image channels of interest. Alternatively, this is where we would recommend using a multi-channel LED Illumination System with a Sedat filter set for best effect: the single-band excitation filters are housed within the Light Source (as in the Pinkel configuration shown in Figure 3), while the single-band emission filters and dichroic are housed within the Optosplit. This setup combines the latest camera, optical filter and illumination technology to remove latencies associated with moving parts while also overcoming the risk of bleedthrough associated with multi-band filters. In this way, you can achieve both high-speed, high-contrast imaging on nearly any basic widefield fluorescence microscope.
Importantly you will also need to have software capable of multichannel imaging and analysis. A combined use of micro-manager and image J is a free option, nevertheless, there are commercial software packages where the ease of use and simplicity is taken into account to facilitate user experience and speed up data capture.
Of notice when dealing with weaker labels the larger format EMCCD cameras such as an iXon 888 model may be required over sCMOS in these types of setups to ensure that enough photons are captured by the sensor to form a high-quality image.
Simultaneous multi-channel imaging with Multiple cameras
Another option for simultaneous multi-channel imaging is using a splitter that splits the image from one port of a microscope across two or more cameras. The main benefit of this approach is that it will provide the maximum field of view of each camera for each image channel. You also get the benefit of choosing the more appropriate camera to image a specific a channel e.g.: an sCMOS camera for the brighter signals and an EMCCD camera for the weakest signals.
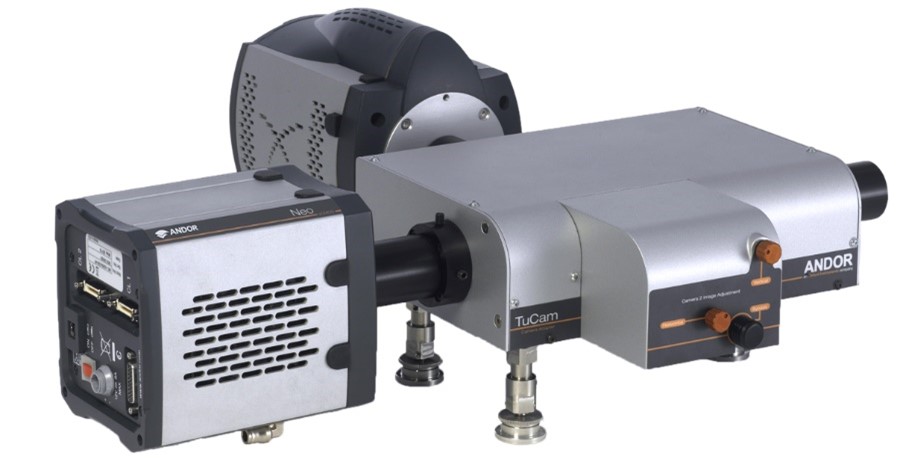
Figure 5: TuCam provides a dual camera imaging solution with each channel being directed to a separate camera. This gets the full available field of view from each camera.
If your microscope still has the original set of objectives it is worth considering making some changes. Microscope manufacturers have introduced updated ranges of objectives, or expanded their ranges, to suit changes in imaging needs. The latest objectives can improve image clarity through better optical correction, and/or field flatness. Your experimental needs may have changed making a different objective magnification more suitable for your current, or future work. A new objective may also have better response in the blue-UV or NIR regions to help make the most of labels that are outside the main visible band of the spectrum.
Automating your stage can be a very useful upgrade for microscopes with a manual stage. A motorized stage with stage controller can allow x and y (and depending on microscope also through z). You can check what is possible for your microscope with your microscope supplier, as well as other 3rd party suppliers who specialize in stages from manufacturers such as ASI and Prior Scientific.
Not only is this a practical and nice-to-have upgrade, making work on the microscope less fatiguing, it can open up imaging possibilities when combined with suitable software. Using automated stages can enable multifield imaging of large sections of tissues, or larger model organisms such as Zebrafish, greatly aiding development biology studies.
Super resolution – the ability to see information hidden below the classical diffraction limit, is generally limited to dedicated high-end imaging systems. For example SIM, STORM or STED. These systems are all capable of improving resolution to different levels, but are restricted to these expensive systems. SRRF-Stream+ offers an excellent route to unlocking super resolution from your normal microscope and lets you observe much more of the inner structure and workings of the cell. SRRF-Stream+ is a camera-based super resolution technique that has been developed from the original NanoJ version of SRRF. SRRF-based super resolution offers many benefits over these other methods- not just that you can access if from a conventional microscope. It is compatible with normal fluorophores and works at low illumination intensities. This makes it applicable for many live-cell studies and flexible for use in many different applications. SRRF-Stream+ has optimized GPU processing so that acquisition and processing steps are done at the same time. This means that real-time live cell super resolution is possible. It is available using iXon EMCCD and Sona back-illuminated sCMOS cameras.
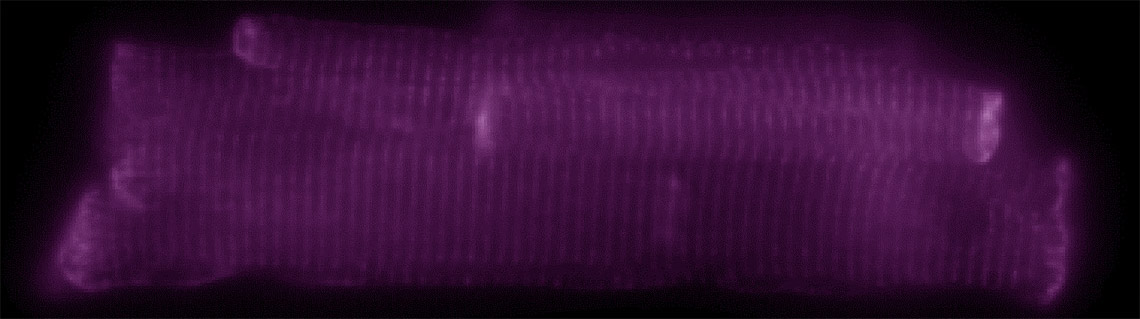
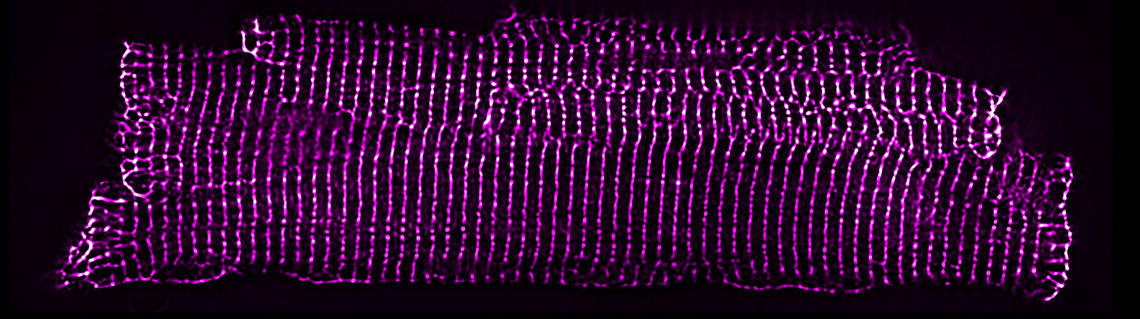
Figure 6: The widefield image (left) hides information below the diffraction limit. Structural details can be revealed in the same image by applying SRRF-Stream+ (right). Image courtesy of Matt Caporizzo.
Find out more about SRRF-Stream.
The field of optogenetics has produced a range of tools and techniques to precisely modulate genes, proteins, cells and physiological responses using light. Techniques such as uncaging of biologically active molecules, photoactivation and inhibition and photo switching are finding ever more uses. Control of illumination intensity and delivery is also key to photobleaching and fluorescence recovery as well as ablation and DNA damage.
In addition to the expanding palette of “optoactive” labels and additional labels to help visualization, a vital part of photostimulation based techniques are illumination devices to precisely control the illumination involved. Two effective strategies have been adopted by many researchers. These are using a form of laser that can be controlled to scan across the sample and targeted at specific point of interest, and secondly project illumination via a digital micro-mirror based device (DMD). The micro mirrors can be controlled to create areas of illumination in complex shapes, multiple regions or patterns with precise timing.
Have flexible multi-region illumination with Mosaic – The Mosaic is a digital micro-mirror based device for photostimulation applications. It can be used to target small regions through to large areas of tissues. Simultaneous illumination is possible across the full image area or specific regions. Mosaic can be integrated into many of the main microscopes and is compatible with different light sources. This makes it very flexible for optogenetics applications using photostimulation, and dynamic cell processes such as trafficking and signalling.
Perform ablation and bleaching with MicroPoint – The MicroPoint is a pulsed laser system capable of ablation, bleaching and uncaging over a broad wavelength range. It is possible to achieve a precise delivery of controlled illumination energy making it applicable from low illumination levels for optical activation of inhibition through to targeted high energy delivery for cell and DNA repair studies. Like the Mosaic, it is possible to integrate this into many of the major microscopes through use of Epi-illumination adaptors.
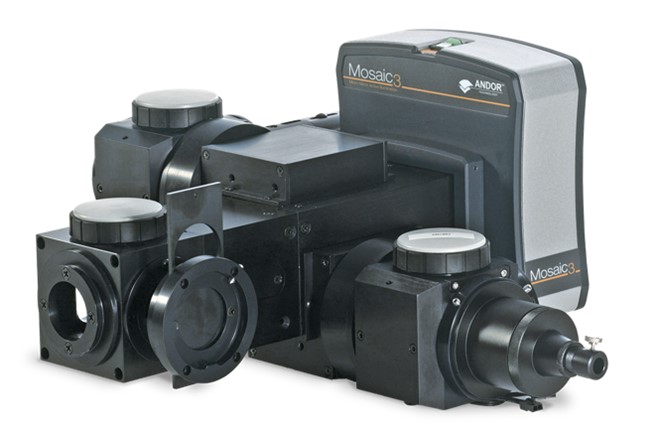
Figure 7: Mosaic enables fine control of illumination to a sample for amazing flexibility in many photostimulation experiments from photoactivation, uncaging to multi-region illumination.
For many, the image acquired from a microscope is not just about getting a good picture to add to your biochemical or molecular studies. Image data can be used for so much more. We can get information about different cellular processes, the cell structure and the myriad of other interactions of the cell through cell development and disease states. Image analysis software has thus become essential for a growing number of researchers in helping tackle the many questions of cell biology.
Software packages such as Imaris provide powerful tools to gain understanding of such questions that would be very slow, if not near impossible, to answer otherwise. Advanced rendering capabilities and use of deconvolution can aid visualization and make image data visually impactful. However, the real scientific impact and ability to answer important questions is provided by analysis features of the software. Useful features include quantifying size and number of cells, and making measurements of distances between components, tracking proteins, studying cell lineage and cell fates. Statistical tests can be used to compare data sets and find relationships that exist, and the effect of different treatments. The features of image visualization and analysis software continues to expand to meet the needs of cutting-edge research, as well as more routine studies. Machine learning based object classification is one example for Imaris that has recently been added, making analysis of large data sets even faster.
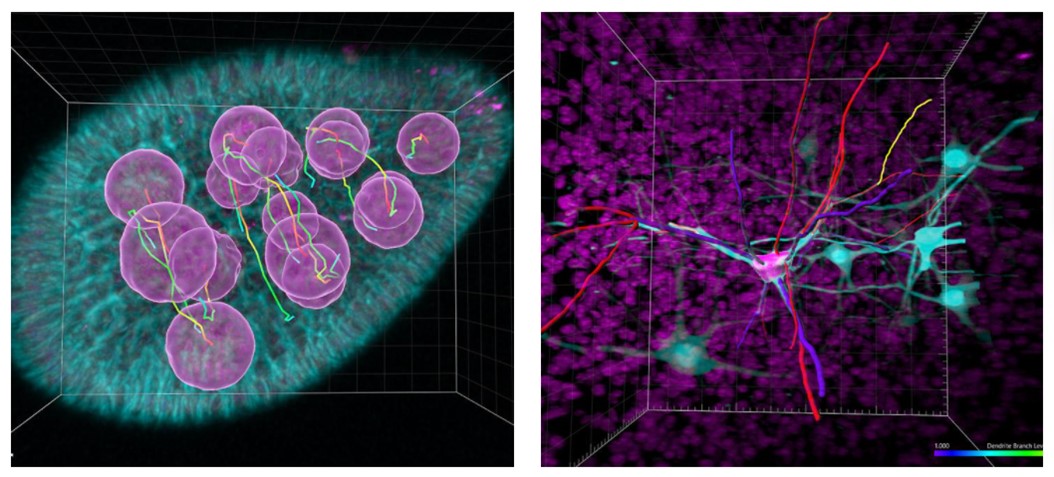
Figure 8: Imaris provides image visualization and analysis tools that can add useful information on processes that would be difficult, if not impossible to determine otherwise.
You can test out Imaris yourself using the free ImarisViewer, or access a free trial.
If you feel like you have taken your microscope as far as it will go, and are considering a new system- please refer to our article that explains the considerations for this topic from imaging techniques to other factors that impact microscope system cost and capabilities.
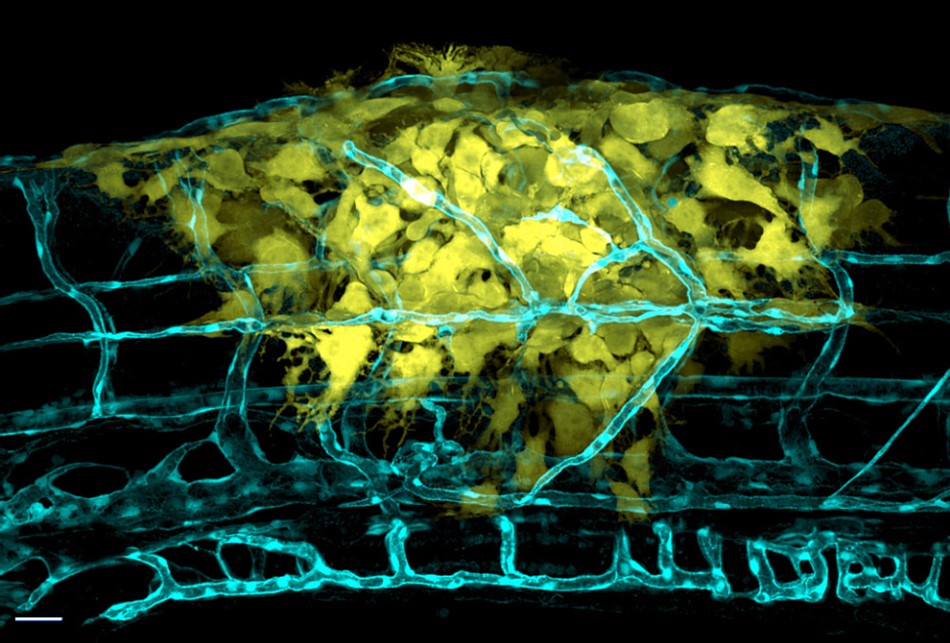
Figure 9: The latest microscopy systems such as the Andor Benchtop Confocal and Dragonfly systems allow amazing imaging performance with widefield, confocal and super resolution capabilities and fully featured software making advanced imaging fast and easy. Image acquired by Julien Rességuier at NorMIC (University of Oslo).

© Oxford Instruments 2026