Resources
 Part of the Oxford Instruments Group
Expand
Collapse
Part of the Oxford Instruments Group
Technical Article
Author: Mark Browne and Alan Mullan
Published: 01 Sep 2024 · Last updated: 09 Sep 2024
Tags: mosaic-photo, micropoint-photo
Photostimulation techniques (PS) are important tools for the study of materials and live biological specimens. Typically, PS uses targeted optical radiation to induce some kind of change (temporary or permanent) in the specimen which is then followed by observation and analysis of the impact of the perturbation. The range of applications is extremely broad, ranging from marking semiconductors and glasses to microsurgery of cells and embryos of model organisms such as C.elegans, Drosophila and zebrafish. Other more sophisticated approaches are applied to transgenic organisms which have been genetically modified to express optically sensitive proteins which can induce behavioral or signaling changes, provide local environment reporting, or both. In the cases we consider here, a microscope is the primary tool of observation.
To target the desired location or feature (s) of the specimen, an imaging device is attached to the microscope. This may be a digital camera, or a scanning device such as a laser scanning confocal microscope. The resulting image is acquired and manipulated by a software application program and displayed on a monitor. There are many different imaging software packages used across life sciences and material sciences that control image acquisition to different degrees e.g. NIS -Elements, cellSens Dimension, LAS-X, Zen and others. This would initially seem to make integrating a photostimulation function problematic. However, one thing that is common is that almost all modern products operate in a Microsoft Windows environment. In order to create a “universal” solution, Andor developed Virtual Camera (VCam), which allows Andor iQ to duplicate pixels from ANY Windows based imaging application and to utilize the resulting image for targeted PS illumination.
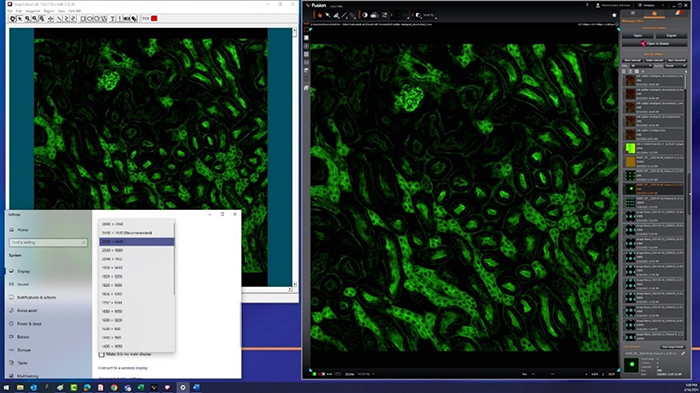
Figure 1: VCam shown being used to capture the image in an acquisition software. Any Windows based image acquisition software is compatible making it an effective solution to integrate photostimulation whatever your preferred software.
Light emitting diodes (LEDs) or laser beams of specific wavelengths are now used as the primary sources of optical radiation for PS. The light from these sources must be manipulated to allow selective targeting at the specimen. This is achieved primarily by two methods: galvanometer steering of laser beams to direct the beam at user-defined target(s); or spatial light modulator (SLM) to selectively deliver radiation to target(s) or to modify optical phase resulting in shaped/reconstructed beam profiles at the specimen observation plane. Andor offers 2 solutions: MicroPoint 4, a galvanometer steered laser beam-based device and Mosaic 3, an SLM device based on digital micromirror device (DMD).
The Virtual Camera can be used with any monitor with screen resolutions up to 2560x1440 pixels. The VCam driver is based on Video for Windows (VFW) that has this maximum resolution limit. While VFW has been superseded with DirectShow and Direct X it provides broad compatibility with most windows-based applications.
The latest widescreen UHD 4K monitors may have resolutions up to 3840x2160 pixels which is above the 2560x1440 maximum handling limit of VCam. Therefore, these monitors should be set to 2560x1440 pixels to ensure normal operation during the photostimulation experiment. Configured this way, the VCam tool will allow calibration and capture of the full image window in any 3rd party application. Suitable 24” HD monitors may be supplied by Andor.
VCam is very easy to set up and some representative images are shown below. The Image control is set to screen capture, and the capture settings are set to capture window. The simple capture options enable adjustments e.g. change the window colour for easy visibility in your regular acquisition software. To setup Pixel Duplication of the 3rd party imaging application: Click on Options then in the next dialog choose Window Selection - hold down the left mouse button and move the Finder Tool icon to the desired Window and release when the correct window is highlighted. VCam will automatically update to highlight the selected window element on screen. Once set then the selected window is locked and you can continue with the photostimulation experiment.

Figure 2: Configuration of the VCam screen capture options. Vcam provides a simple yet effective means to match the photostimulation device to any Windows based software.
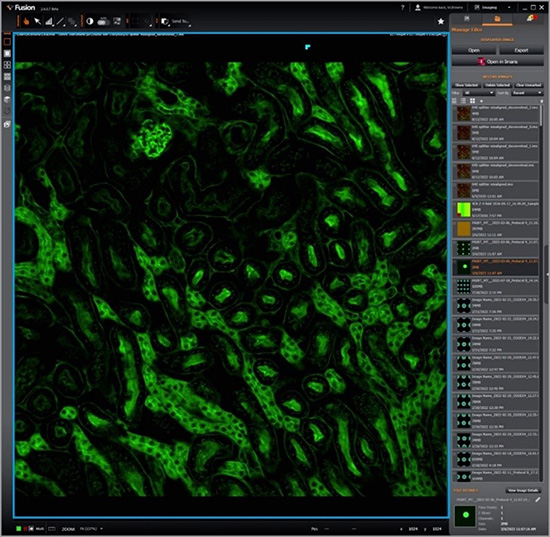
Figure 3: The Active selected area of the software highlighted in blue- in this case Andor Fusion.
The specimen image and PS illumination control must be calibrated together so that the desired location(s) and feature(s) on the specimen during experiments can be precisely targeted through the iQ Software. To achieve this, VCam is used to monitor the microscope image plane with a special calibration specimen loaded and focused on the microscope.
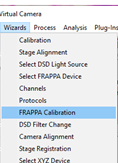
Figure 4: Select FRAPPA Calibration to run or review a current calibration
A calibration wizard makes this process easy – steps guide the user through the calibration process. Calibration needs to be performed for each objective. The calibration for Mosaic and MicroPoint is the same, note however that more calibration points are used for the MicroPoint calibration.
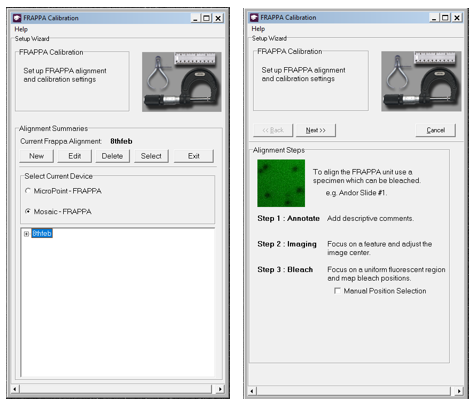
Figure 5: Follow the on-screen instructions for in the Calibration Wizard for the appropriate device e.g. Mosaic.
The calibration is based on a series of calibration points that cover the addressable area of the photostimulation device. A calibration should be performed for each objective to be used. The user confirms each visible point in the acquisition software within the VCam display. A message in the left panel will indicate when the calibration is complete.
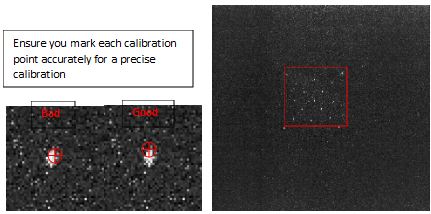
Figure 6: The wizard guides the user through the calibration. Mark each point in turn precisely. An example of a complete calibration for the MicroPoint is shown to the right. The ROI shows the region available for photostimulation. The available area will depend on the model of Mosaic or Micropoint as well as the objective used.
Once calibration is complete, the photostimulation device co-ordinates are precisely matched to the specimen image. You can target specimens interactively, or in user-specified sequences with precision and accuracy during the photostimulation experiment.
MicroPoint and Mosaic each have a range of settings that can be adjusted within iQ to create the photostimulation experiment (see figure 7). For Mosaic set illumination power for the illumination source.
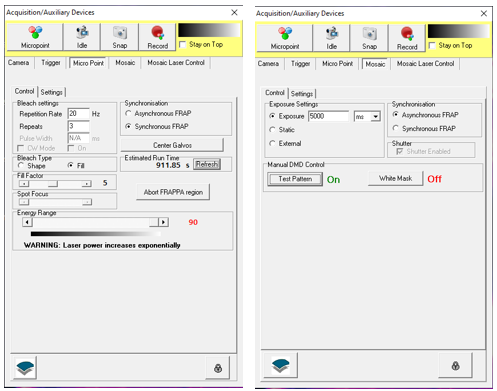
Figure 7: Left typical settings for MicroPoint and right, settings for Mosaic
Regions for FRAP, points or lines to perform ablation or activation can be selected and overlaid against the live display. Note that the Mosaic can provide illumination simultaneously across multiple regions whereas MicroPoint will scan selected regions rapidly. A run time calculation will be displayed for the experiment. MicroPoint 4 will scan areas significantly faster than the previous Micropoints due to faster beam steering provided by the fast galvos as well as improved logic from the microcontroller to scan shapes or regions.
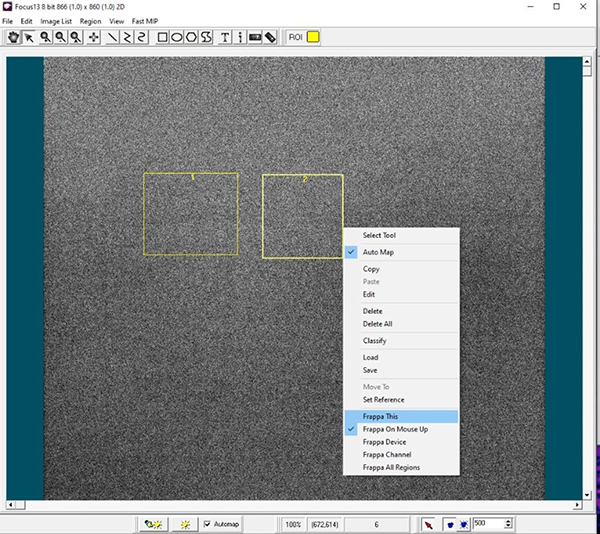
Figure 8: A range of tools are available to set different regions to perform photostimulation experiments such as cutting, ablation activation and FRAP.
iQ software provides an effective way to integrate photostimulation to an imaging system using 3rd party acquisition software. This enables the normal acquisition and microscope software environment to be used to controlling the devices, and the required photostimulation functions can be applied through iQ. iQ software is compatible with any windows based software by using VCam. The latest version of iQ 3.7 provides control of the latest MicroPoint 4 model. iQ version 3.6.5 should be used for previous MicroPoint models and Mosaic 3.

© Oxford Instruments 2026