Resources
 Part of the Oxford Instruments Group
Expand
Collapse
 Part of the Oxford Instruments Group
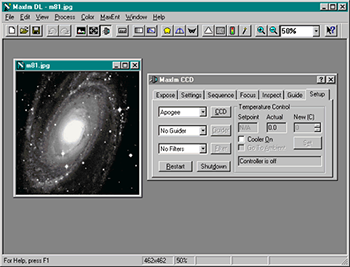
Your Apogee Imaging Systems CCD camera may be controlled by MaxIm DL CCD camera-control software by Diffraction Limited. Although MaxIm comes with its own user's guide and extensive online help, we have created this general camera/software overview to help get you started quickly.
As you unpacked your Apogee CCD camera, you probably noticed that it has no external switches or controls. When properly attached to your computer, the camera is powered up or down whenever the computer is turned on or off, and all camera functions, such as turning on the thermoelectric cooler and setting the temperature, setting the shutter speed and taking an exposure, are controlled by MaxIm.
Every Apogee camera is tested before shipping, but damage may occur during shipment, or there may be another device on your computer that conflicts with the ISA bus controller-card for the camera. Having installed the camera and software, the first thing you will want to do is take an exposure with the camera to make sure the system is working properly. Follow the steps below to do the first checkout.
Apogee CCD cameras come in a variety of sensor sizes, digitization resolutions, and optional features, all of which need to be taken into account for proper handling of the image data by the software. MaxIm must have a list of these parameters in order to control the camera and display the images. The parameters for your camera are listed in a camera initialization (INI) file and shipped with the camera on a diskette with an Apogee label. This file needs to be copied to a convenient location on your computer (most commonly the MaxIm directory) and then processed by MaxIm each time that you use the camera.
Camera initialization files on the Apogee diskette are named for their respective camera models (e.g., AP1.ini). Select the INI file for your camera and copy it onto your computer. In most cases, no changes to the standard INI files are necessary prior to use. However, if you purchased extra cable length with your camera, you may need to edit the INI file "cable=" parameter. See the document entitled, "Initialization Files" for instructions on changing the settings of the INI file. In any case, do not make changes to the INI file on the diskette. Instead, copy it to your computer and make changes to the copy. That way, you will have a backup of the file if restoration is needed later.
After copying the INI file to your computer, launch MaxIm and click on the camera icon on the toolbar to open the MaxIm CCD window.
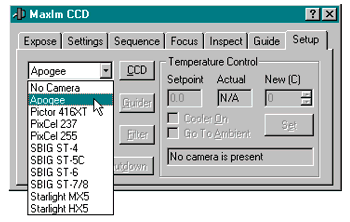
The MaxIm CCD window opens with the Setup tab active. First, select "Apogee" from the list of cameras in the selector box. Then, click on the CCD button to open the Setup Apogee window.
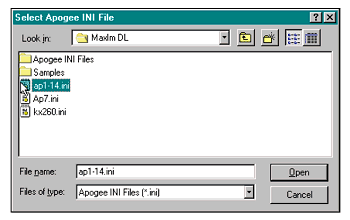
In the Setup Apogee window, click the Set button to specify the path so that MaxIm can find the camera INI file. Choose the directory on your computer where you copied the INI file for your camera. Highlight the INI file and click "Open," then click the "OK" button in the "Setup Apogee" window. If the camera is not found after clicking "OK," see the "Troubleshooting" section at the end of this document.
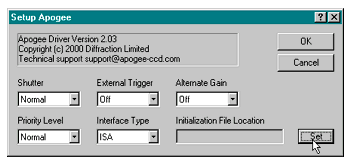
There are five camera options with scroll boxes in the Setup Apogee window. After selecting the appropriate INI file, these options will go into effect when you click "OK" on the Setup Apogee window. These options are as follows:
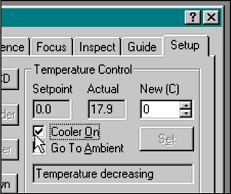
Apogee CCD cameras are cooled cameras. A thermoelectric cooler lies beneath the CCD sensor to cool it and thereby reduce the contribution of thermal signal in the images. The user must turn on the cooler and select an operating temperature. This is done under the Setup tab of the MaxIm CCD window. Most Apogee cameras will reach a maximum cold temperature at around 30 to 35 degrees C. below ambient. The AP7 and AP8 cameras can cool as much as 50 to 55 degrees C. below ambient.
After the INI file has been selected and processed, the Setup tab of the MaxIm CCD window reports that the controller is off. Click the box beside Cooler On to turn on the CCD cooler. Use the scroll arrows in the New (C) box to set the cooler for the desired temperature, then click the Set button. The Set button is greyed out unless you change the number in the New (C) box. Choose a temperature in degrees Celsius that is at the lower limit of the temperature delta. If the cooler reaches its maximum cooling capacity, it will automatically reset itself 2 degrees C. warmer than its maximum, to ensure that it can maintain the setting. It is a good idea to monitor the Actual temperature reading during an imaging session, since changes in ambient temperature affect the operating temperature of the cooler (i.e., as the ambient temperature increases, the cooler will adjust itself if necessary, without warning). If you will be calibrating your images with dark frames, you will want to have calibration dark frames taken at the same temperature as your image frames. Don't be alarmed by one- or two-degree fluctuations of the temperature reading as it hovers around the set point. The software takes a running average and should be regarded as only an approximation of the CCD temperature.
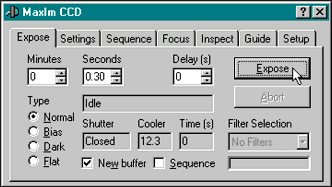
Click on the Expose tab of the MaxIm CCD window to set the exposure parameters. The length of the exposure can be set to minutes or seconds, or both. Values can be entered by first double-clicking on the numbers inside the scrolling text boxes and then overwriting the existing numbers. The scroll arrows were designed to efficiently increase or decrease the exposure times, regardless of how short the exposure is. For instance, if "0.02" is entered, clicking the scroll up arrow will increase the exposure time by hundredths of a second until "0.10 "is reached. The scroller will then increase by tenths of a second until "1.0" is reached, etc. A pre-exposure delay can be set by entering a value in the Delay (s) box. Check the New buffer box if you wish to prevent the current displayed image from being replaced by the incoming image. Check the Sequence box if you wish to take a set of exposures and save them to disk. Note that each exposure of the sequence will be delayed according to the delay value that you set, which is helpful during autoguiding or for allowing some time to change filters between exposures. The parameters for sequencing are in the Sequence tab. See the MaxIm manual for details of setting sequences.
Click on the type of exposure you wish to take:
When all the exposure settings have been selected, click the Expose button to start the exposure. Click Abort to cancel an exposure.
Before displaying an image, MaxIm determines the display scaling based on pixel values in the image. Depending on the contents of an image, the autoscaling chosen may or may not be appropriate for the region of interest. To adjust the display scaling, click the histogram button on the toolbar to open the Screen Stretch window.
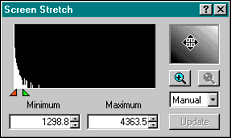
Both contrast and brightness can be adjusted in real-time by placing the mouse cursor in the gradient box (shown at right) and holding down the left mouse button (cursor changes to four arrows). Then, as you continue to hold the left mouse button and move the mouse left, right, up, and down on the mouse pad, the image scaling will be adjusted. Release the left mouse button when the image scaling is satisfactory.
You can also adjust the display by using the mouse to "grab and slide" the left and right triangles under the graph in the histogram window. The image display refreshes automatically as the triangles are moved back and forth.
TIP: Hold down the "Shift" key while sliding one triangle and both triangles will move together, allowing a constant range to move across various brightness levels. Hold down the "Ctrl" key while moving one triangle and both triangles will move toward or away from each other.
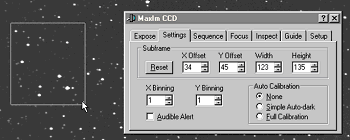
The Settings tab of the MaxIm CCD window is where you set frame size and calibration parameters. Set X and Y binning factors using the scroll arrows or by typing the numbers into the appropriate boxes. Set image offsets and subframes by typing their numerical values, or mark off a region of an image by clicking and dragging the mouse (the frame offset and size values will be updated as you drag).
The Settings tab is also where MaxIm allows you to set simple dark subtraction or full calibration (dark subtraction, bias subtraction, flatfield division), to be performed automatically when taking normal exposures. Click on the desired option. Note that with Simple Auto-Dark selected, a dark frame precedes the first normal frame taken, and is subtracted from all subsequent normal exposures. When any of the imaging/exposure parameters change, a new dark frame is automatically taken prior to corresponding normal frames. Also, before Full Calibration can be checked, you must already have acquired and set up the calibration frames using the calibration wizard. See the MaxIm manual for help with calibration of images.
Since you cannot look through the camera, taking an exposure and inspecting the image for sharpness is the only means of achieving focus. This can be laborious at full frame, especially in a large-format 16-bit camera, such as an AP2. To speed up the process, MaxIm has a focus mode. Mark off a region of interest (e.g. a star) in the first image and focus mode will download only that portion of the CCD in a continuous sequence of subsequent exposures. While focus mode is operating, the user can make adjustments to the focusing mechanism and see the results of each adjustment in the next image readout.
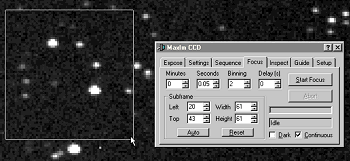
The Focus tab holds the parameters for focus mode, which are independent of the Settings tab parameters. Focus binning and subframing parameters are entered the same way as those in the Settings tab. If the image is grossly out of focus, bin the image pixels 2 x 2 or 3 x 3 to speed things up. If the image is close to focus, use 1 x 1 binning and zoom the image. As the focus image updates, the zoom setting will stay constant, allowing close inspection of edge details for best focus.
Click the Auto button to have MaxIm choose the brightest point of the image and center a subframe region around it. Click the Reset button to allow full-frame mode or to select new region. Placing a checkmark in the Dark box will indicate that you wish to do an automatic dark subtraction of each image before display. The Continuous check-box toggles between one-shot and sequence modes.
When the parameters are set, click the Start Focus button to begin the focus sequence. When sharp focus is achieved, click Abort. For more focus help, see the section on the Inspect tab in the MaxIm manual.
MaxIm can store files automatically (the path and filename are entered in the Sequence tab of the camera-control window) or manually in a variety of formats: Bitmap, JPEG, TIFF (8- and 16-bit), FITS, and camera-specific native formats. Apogee cameras do not have a native format. When recalling images from disk, you may open multiple images at once by holding down the "Ctrl" key (highlights individual files selected) or "Shift" key (highlights all files between the first and last files selected) when clicking a filename in the selector box.
Before exiting MaxIm, you must first shut down the camera using the Shutdown button under the Setup tab of the MaxIm CCD window. If you wish to return to MaxIm and operate the camera again before powering off the computer, you can choose to keep the cooler running. If you will not be operating the camera again prior to turning off the computer, click the Go to Ambient box.
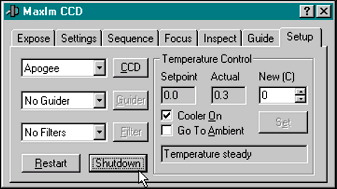
The next time you launch MaxIm, whether or not the computer has been turned off, you do not have to select the camera initialization file again. Instead, click the Restart button under the Setup tab of the MaxIm CCD window to initialize the camera.
The most common camera error is the result of an ISA-bus conflict. The camera may respond erratically or not at all, or the cooler may not function properly if there is a conflict with the base address. There are several base address options to choose from, and it may require some trial and error before you find an address where the camera will operate properly.
The camera will not initialize if you select the incorrect interface type in the Setup Apogee window. Make sure "ISA" is selected under interface type if you are using an ISA-bus card for connecting the camera to the computer. Select "Parallel Port" if you are using a camera connected to your computer's parallel port.
Parallel port cameras must use either bidirectional or ECP printer ports. If your printer port is set up as ECP, make sure the camera INI file is set to "ecp=on".
Remember to keep your software up-to-date by staying in touch with Diffraction Limited. See your software manual for contact information or visit the Diffraction Limited website here.
